


Need help understanding various compressor types and the best ways to use them? You've come to the right place.
What type of compressor should you use?
If you’ve shopped for a compressor, doubtless you’ve seen compressors of various types, including opto compressor, VCA (Voltage Controlled Amplifier), FET (Field-Effect Transistor) OverEasy (the ratio increases as the signal gets hotter) and variable Mu, which uses the natural compression characteristics of tubes. Each has its own method of reducing gain by virtue of what type of components act on the incoming signal, and each has its own sound.
It’s hard to say which is the most effective for a particular job, but they seem to have divided themselves into accepted uses. Designers such as Joemeek’s Ted Fletcher believe that opto compressors are more "musical" than VCA compressors, which, to his way of thinking, stonewall the signal as opposed to the non-linear behavior of the opto compressors. Conversely, the linear behavior of VCA compressors actually makes them more transparent in operation. Transparency, combined with the VCA’s ability to stonewall a signal, makes them a great tool for overload and speaker protection, as well as audiophile recording, where the natural sound of the instruments is preferred over affectation. Opto compressors tend to color a signal more, and are therefore used for effect.
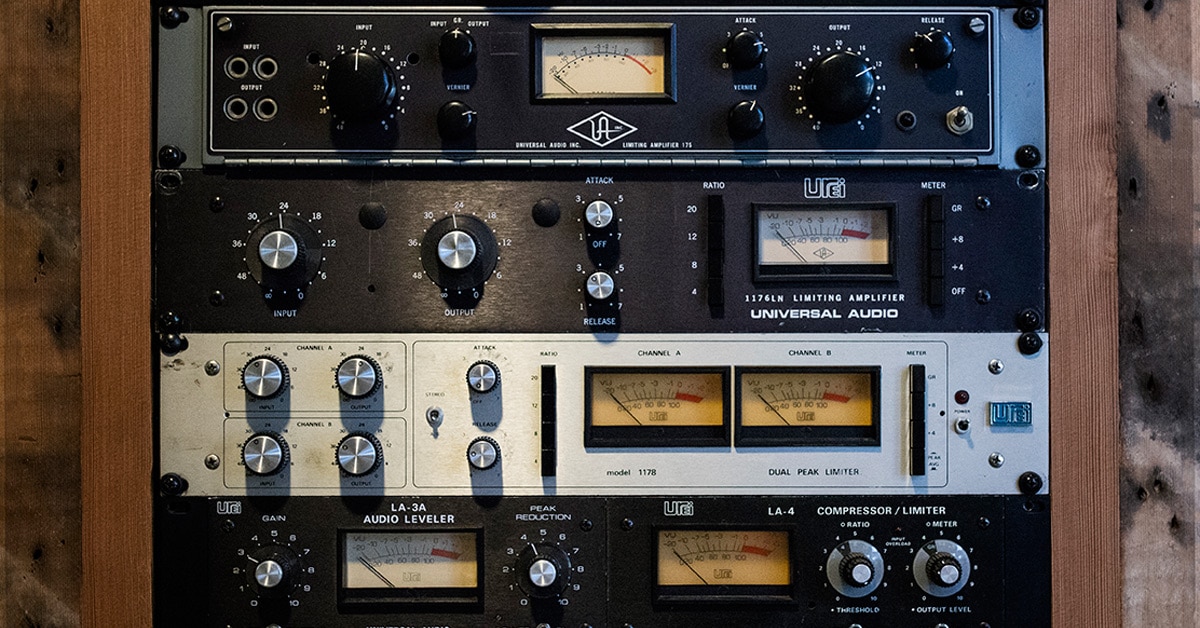
Opto compressors, such as the Universal Audio LA-2A, are popular for treating vocals, drums, and bass guitars in pop and rock music, where a larger than life sound is desired. By the same token, the Universal Audio 1176 LN, which as an FET compressor, is one of the most popular of all time for drums, electric guitar, bass and bus compression (two linked in stereo).
Universal Audio CEO Bill Putnam speaks with Musician's Friend about the history of the classic UA 1176 compressor.
Compressors that use tubes for gain reduction (variable Mu) are most popular for overall mix compression and are mainly used in mastering. They provide the glue that holds a mix together while allowing each instrument to retain its sonic integrity.
You’ll still need a hardware compressor for DAW tracking. Speaking of DAWs, while it is tempting to drop a software compressor on every track because you can, be aware that they also mimic the effect of making noise louder as well. Plus, they can also affect the overall sound of your mix in ways you don’t expect and won’t want. Since they are really just crunching numbers, the more math your computer does, the longer digital words get. Your CPU can only handle words of a given length, which means a word that’s too long gets truncated (a nice way of saying chopped off at the knees or guillotined, if you will). In that truncation, you can be losing sound quality and low-level detail (such as reverb tails). The same rule especially applies for overall mix compression. Like any seasoning, it’s best used sparingly, or you may be sending a mastering house a mix they can’t fix.
Tips for Using A Compressor
1. When in doubt, don’t compress. It can always be added later, but never undone if recorded on the front end. For example, if you have an electric or acoustic guitar part that sits fine in a mix as is, leave it be.
2. If you plan on having your music professionally mastered, avoid putting a compressor on the stereo L/R main bus to compress the entire mix. If you do put compression on your mix (some people like it regardless), send two mixes to your mastering engineer, one with compression and one without. If they can work with your compressed mix and feel that it doesn’t compromise their process (and ultimately your music), then fine. If not, they have what to work with. Don’t use compression solely for the reason of making a mix louder. While many engineers do this, the danger is that an over-compressed mix will lose contrast and will sound dull and boring, losing the listener’s ear. Some mastering engineers actually wind up using expanders (the electronic opposite of compressors) to try to bring back the dynamic range lost by over-compressed mixes.
3. A good way to use stereo bus compression is when you route drum tracks to a stereo bus (not the main L+R) to create a submix. Insert a compressor and an EQ on your stereo bus (this works in hardware and software), squash the drums, boost the highs at 10kHz, lows at 80Hz (leave everything else flat) and send the bus output into two open channels of your mixer. Pan one channel hard left, the other hard right. Now, sneak the drum submix into the mix along with the normal drum tracks so that it widens and reinforces the drums without overtaking them. Congratulations, you have just learned how to create what’s called the "New York" drums sound. This is great for any percussion-driven music, such as rock or hip-hop.
4. To get more snap out of a snare, set an attack time that allows the entire transient to pass. Start with a ratio between 2:1 and 4:1. You’ll need a slower attack time and a fairly quick release. This one requires experimentation. Run your snare track through the compressor starting with the fastest attack possible. You’ll hear a very clipped attack. Now start dialing the attack back (slower) until you hear more of the transient. Don’t be afraid to go beyond the transient and dial back to a faster release until you know that you’re getting just the transient (like setting the water temperature of a shower, where there seems to be only a micro nano-meter between fantastically hot and freezing). Once you have it, set a fast release time. What you’ll hear is the entire attack passing while the sustain portion of the sound dips down for a moment and then rises quickly. This increases the level between transient and sustain giving the illusion of a louder attack combined with a subtle pumping of the snare, which contributes to musical drive.
5. If you’re working with sampled cymbals and want to create a more realistic decay, as though a drummer hit the cymbal and moved on (so to speak), set a longer release time on the compressor. You can adjust the release time to coincide with the next musical event so that there’s not too much overhang, just enough to give the impression that the cymbal is fading of its own accord and not by gating or fixed sample length.
6. Ducking rhythm tracks is another way to use compression. Let’s say you have guitars and synth pads that by themselves sound good and balanced. The bad news is that when the vocals come in, they are fighting to be heard. This technique requires the ability to send a signal to the sidechain of a compressor that will control the volume of the guitars and keyboards. With plug-ins, this is easy if they have sidechain access. Just bus an output from the vocal track to the sidechain key in of the compressors. The rhythm tracks will duck when the vocals come in and go back to normal when the vocals exit. For rhythm tracks, you can use a higher ratio, ranging from 5:1 to 7:1. This also helps to keep them even throughout the song.* Set the threshold so that when the vocals come in, the rhythm tracks simultaneously decrease (or duck) by 2dB to 3dB. Set a fast attack and a long release (1 sec-2 sec). Naturally, you’ll have to adjust the release to suit the music. A fast release time will cause the tracks to pump, which you can also use to your advantage in terms of creating musical drive by adding a subtle pumping to heavy guitars. Again, experiment.
*When you have tracks that need to keep fairly constant in level throughout a song, such as rhythm guitars (clean or distorted), synth pads and backup vocals, it’s okay to use a higher compression ratio. Some engineers will use ratios as high as 5:1, 6:1 and 7:1. As ever, it depends on your tracks. You may choose a lower or even higher ratio depending.
7. To remove sibilance from vocals and harshness from cymbals, a technique called de-essing is called for. This uses the sidechain input of the compressor and a parametric equalizer. Split the output of the vocal track so that along with your normal main out, you are sending to the equalizer as well. The output of the equalizer will go into the sidechain key input of the compressor. To start, you will be monitoring the EQ only. Usually, vocal sibilance occurs in the range of 3kHz to 8kHz. For cymbals, harsh sounds can occur between 5kHz and 10kHz. We’ll talk about treating vocals, but the technique applies to both. On the equalizer, turn the boost all the way up and sweep through the frequency band (while the vocal track is playing) listening for sibilance (the hissing sound of "s", also "t", "ch", and "sh"). When you find the most obnoxious frequency, set a very narrow Q (bandwidth) so that the compressor will just react to the evil frequency and not squash the good and pure. Leave the signal boosted anywhere from 10dB to 15dB. Now drop in the compressor, and with a high ratio (8:1-10:1), listen to the track. Start with the Threshold set high and then lower it until you hear and see the compressor acting on the sibilance. Gain reduction should show between 3dB and 6dB on the meter. If the compressor is acting on some but not all of the sibilance, the frequency may not be set right or the bandwidth (Q) may be too narrow. Try widening the bandwidth a tad and adjusting the frequency until you get the behavior you’re after. By the way, don’t worry about the oddly EQed vocals, you’re not going to hear them.
Recommended Compressor Settings for Different Instruments and Vocals
While the basic setting we gave early on will work as a jumping off point for most compressors and applications (particularly well on the Tube-Tech CL 1B), keep in mind that each compressor reacts differently. Even two of the same model will have slightly different characteristics. Here are some basic settings by instrument that work well for VCA compressors. Again, there are no hard and fast rules or formulas that work in all situations. First and foremost, decide if you even need compression and go from there.
Key to Attack/Release-Times Mentioned Below
Fast = 25-50ms; Medium = 100-500ms; Slow = 1–2sec (all are plus or minus).
Basic Compressor Settings
| Application | Attack | Release | Ratio |
| Vocals | Medium-Fast | Slow-Medium | 2:1 - 4:1 |
| Electric Guitar | Fast | Slow | 4:1+ |
| Acoustic Guitar | Medium | Medium | 2:1 - 4:1 |
| Drums | Fast | Fast | 2:1- 4:1 |
| Piano | Medium | Medium-Fast | 2:1- 4:1 |
| Bass | Fast | Medium-Fast | 4:1 |
|
Brass |
Fast | Slow | 4:1 |
Our Final Thoughts on Compressors
While it may seem that this tip is quite lengthy, we haven’t covered all of the uses and possibilities of compressors, but this should be enough to keep you going for a while. There are also other dynamics processors to talk about, which include levelers, limiters, expanders and gates. Look for them in upcoming tech tips.
Shop the huge selection of compressors and limiters at Musician’s Friend.